How to design full-color transfer stickers in Adobe Illustrator
Geplaatst door Sticker Mule op
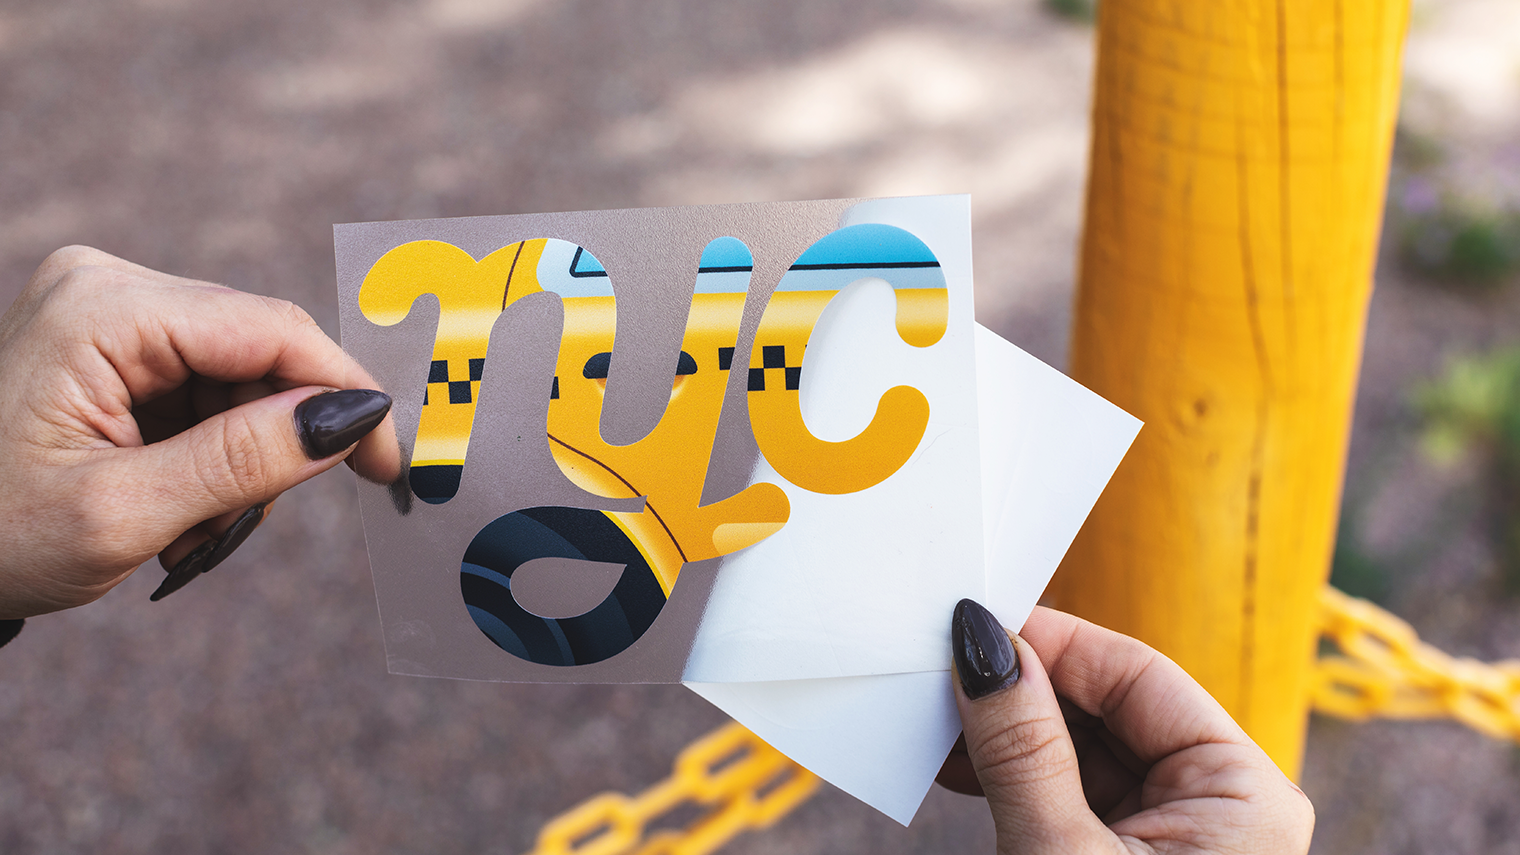
There’s something special about full-color transfer stickers. Unlike most stickers, they have no background or border—the design itself is cut from a sheet of vinyl and transferred to a surface.
This creates a clean, seamless look that feels like it’s always been part of whatever it’s applied to, whether it’s glass, a vehicle, a storefront, or anything else.
For years, single-color transfer stickers have been the standard—but we knew there was room for innovation. Our engineers worked tirelessly to develop cutting-edge machines, and the results exceeded our expectations. Transfer stickers are now available in full color, eliminating the old one-color limitation.
In this guide, we’ll cover the key factors to consider when designing transfer stickers to ensure top quality. Whether you’re working with us or another transfer sticker printer, your design must meet specific requirements to avoid production issues. While we always proof designs before printing, nailing it from the start is the best way to ensure a flawless final product.
How to design full-color transfer stickers in Adobe Illustrator
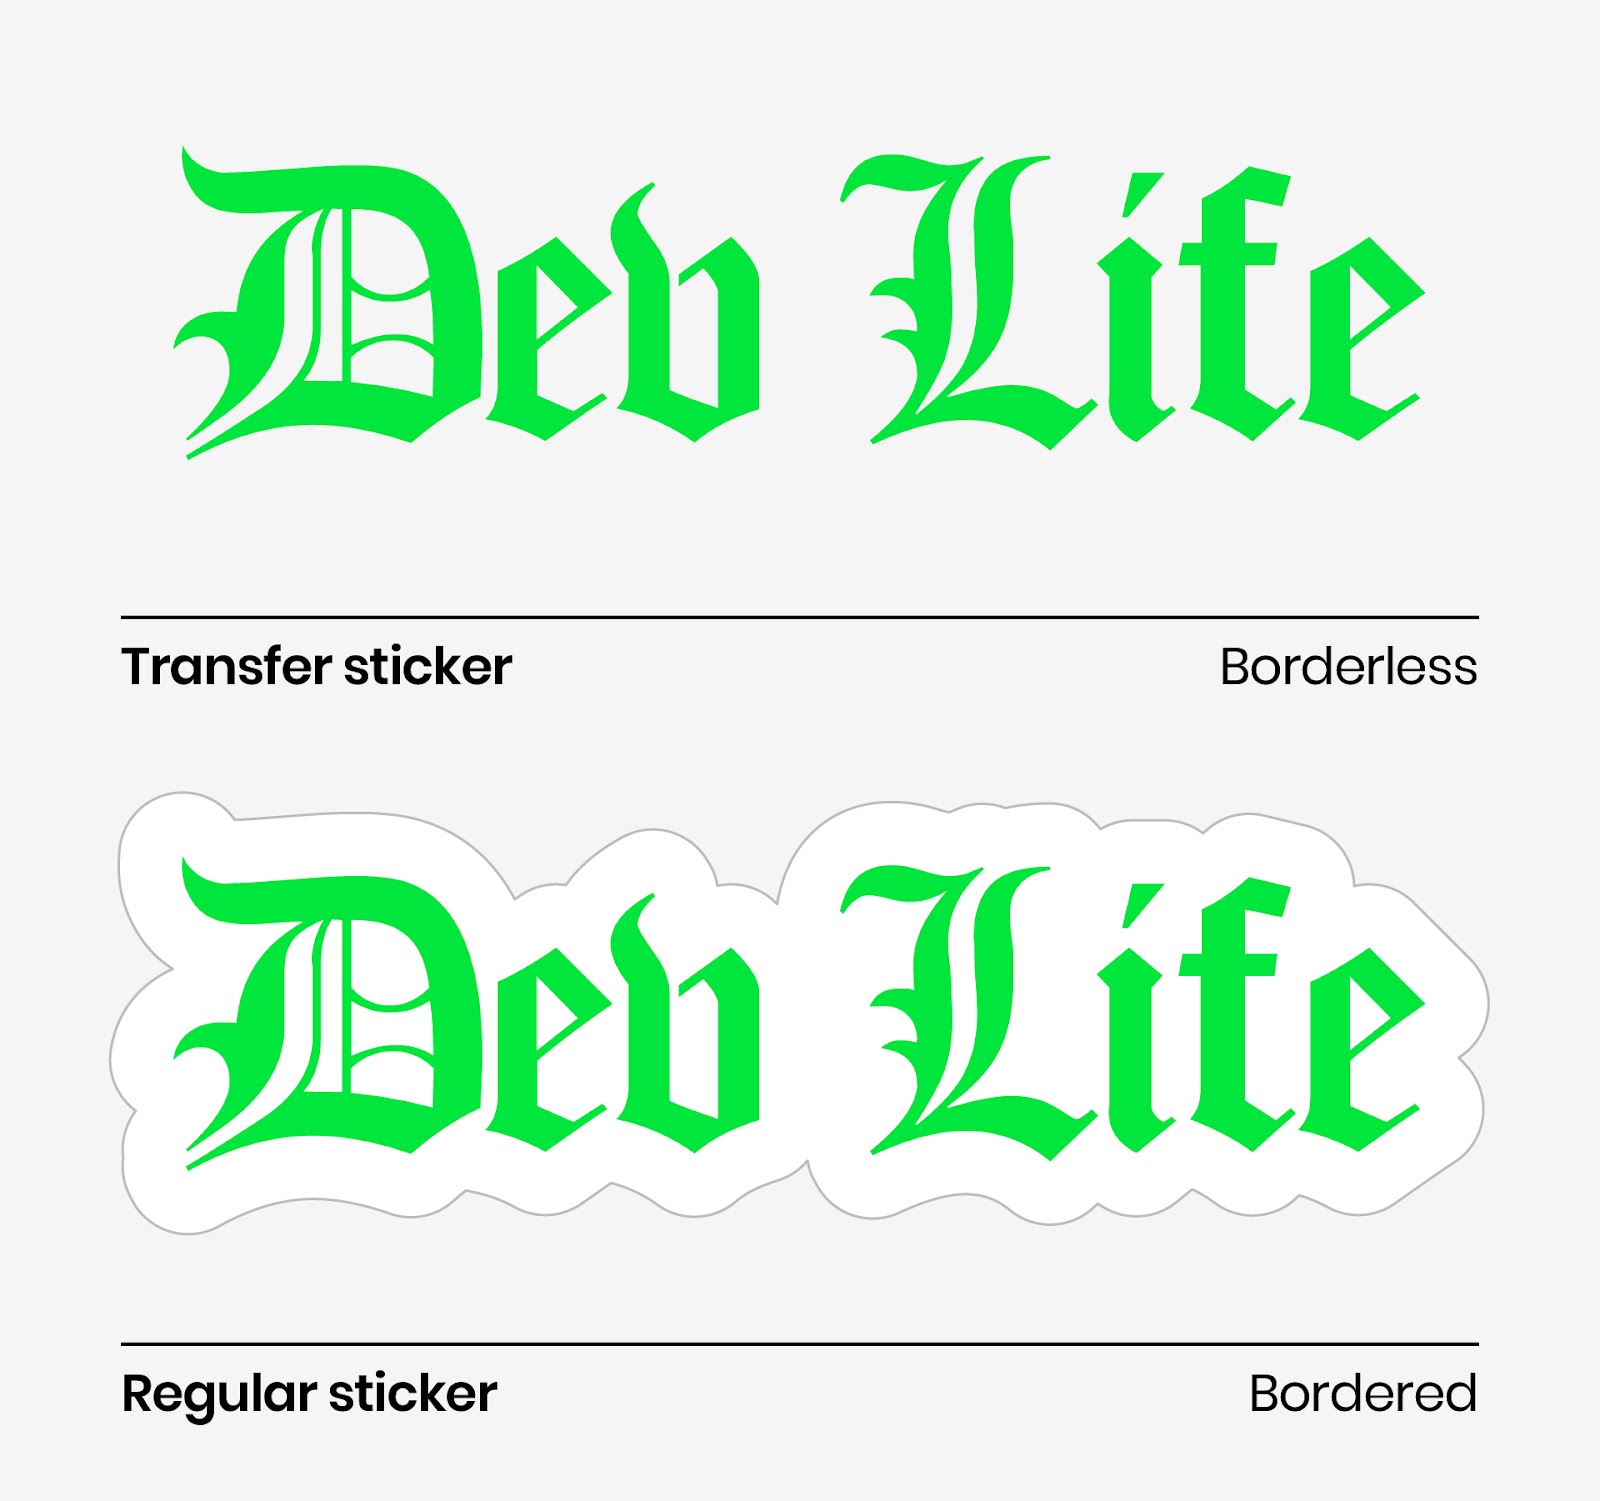
The biggest difference between transfer stickers and regular stickers is clear in the following example. Unlike regular stickers, transfer stickers don’t require a border or a connecting background. Instead, a transfer sheet holds all elements together during application and is removed afterward, leaving only the design on the surface.
Now that we understand the differences, let’s go over the key factors to consider when designing your own transfer sticker. Since each detail is individually cut, there are some limitations on the size and intricacy of certain elements compared to regular stickers.
1. Solid parts
The solid parts of your design are what remain on the surface after application. These elements must be large enough to maintain their shape and avoid tearing during the cutting or transfer process. The thinner the element, the more fragile it becomes.
Minimum Size for Solid Parts:
Every solid element in your design should be able to fit at least a 0.08” circle. This ensures the parts are sturdy enough to be cut cleanly and transferred without breaking.
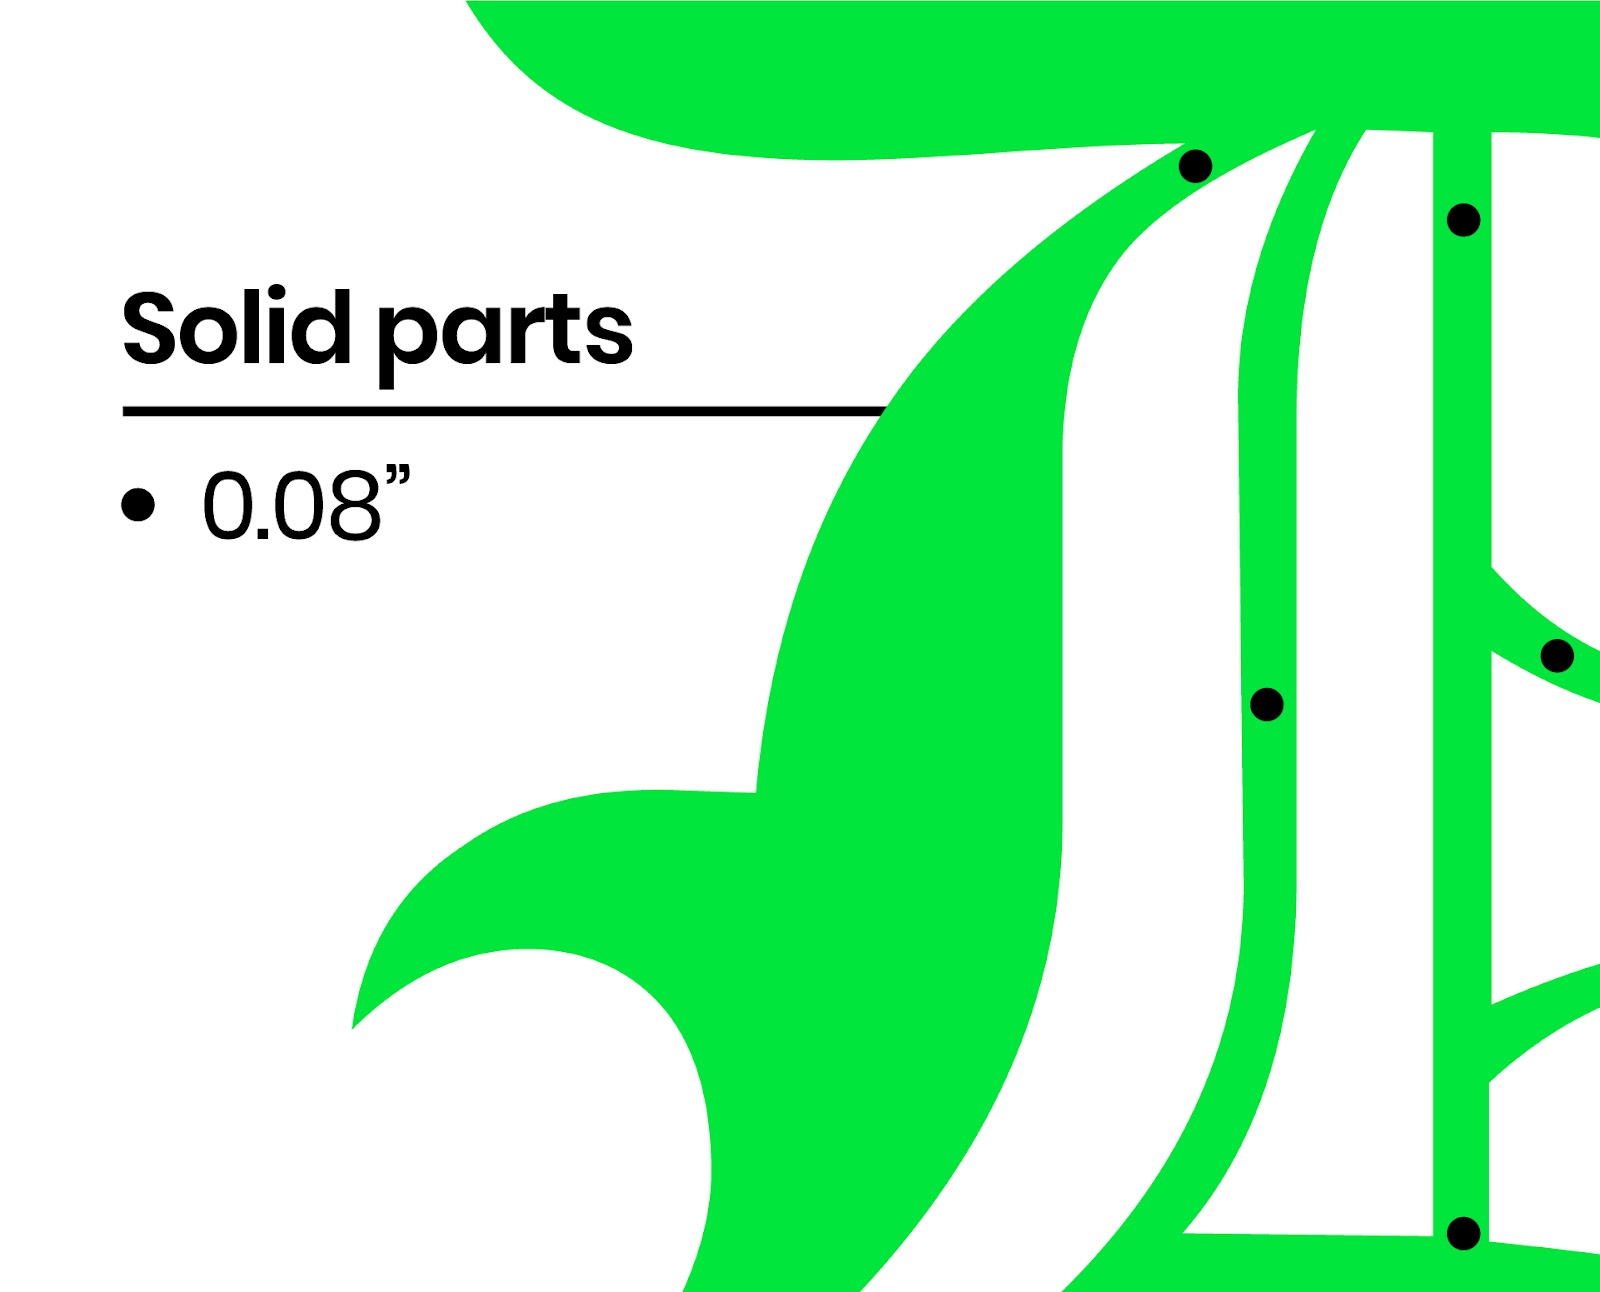
In Adobe Illustrator, select the Ellipse Tool (L) and click once on your artboard. This allows you to enter precise dimensions without trial and error. Once created, drag the circle across your design to quickly check element sizes.
If any part of your design is smaller than 0.08 inches in diameter, the material may be too thin to cut properly and could fail during the transfer process. Ensuring your design has sufficiently wide solid areas will help prevent issues and result in a smooth, durable sticker after application.
2. Removed parts
The removed parts of your design are the cut-out areas that give transfer stickers their signature clean look, helping them blend seamlessly onto a surface compared to regular stickers. However, if these gaps are too small, the transfer may not come out as crisp as expected. Our goal is to help you avoid that.
Minimum Size for Removed Parts:
Any gaps in your design should be large enough to fit at least a 0.09” circle. If they are smaller, the material may not be removed cleanly, and the design could be compromised during the transfer process. Use the same Ellipse Tool mentioned earlier to quickly check these margins throughout your design.
Ensuring that both the solid and removed parts of your design meet these minimum size requirements will result in a more durable and visually appealing transfer sticker.

Proportions are key when designing transfer stickers. While thin lines and intricate details may look great on screen, they can be difficult to cut and transfer properly. That’s why it’s essential to meet the minimum size requirements for both solid and removed parts. Ensuring these elements are properly sized will help your custom transfer stickers turn out exactly as intended.
3. Keep it borderless
One of the defining features of transfer stickers is their borderless design. Since they have no backing or outline, it’s important to avoid adding unnecessary borders or backgrounds. Designing them like regular stickers can diminish their unique, seamless appearance.
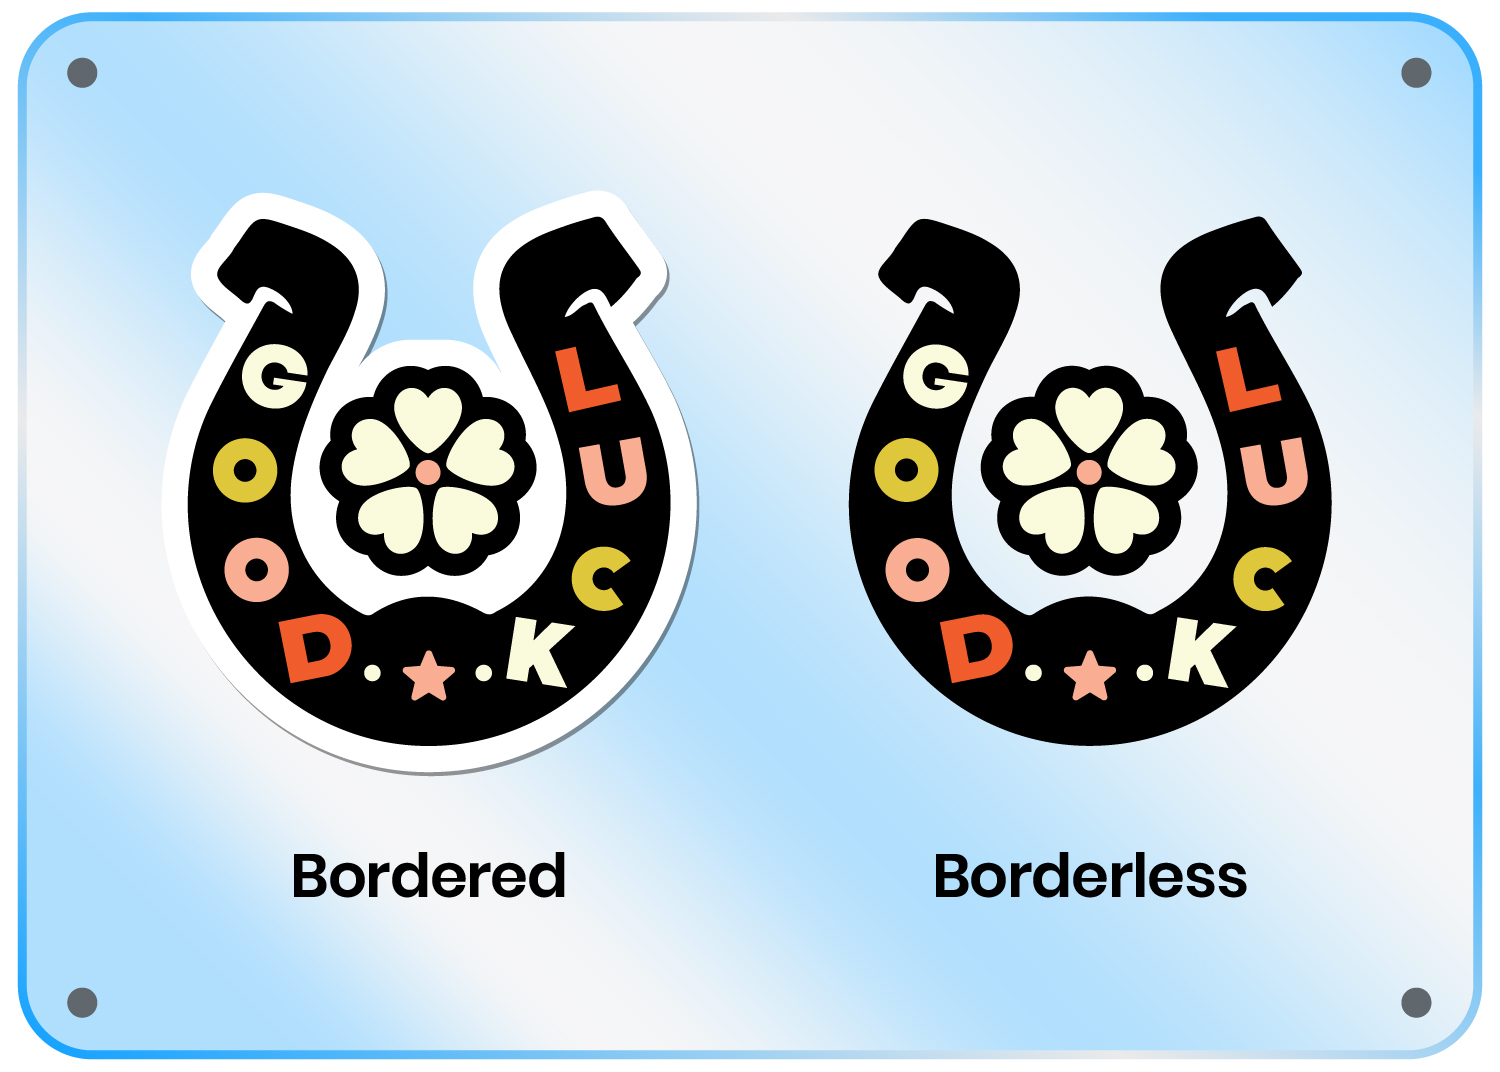
If you're tempted to use Offset Path in Adobe Illustrator to add a border or enclose your design in a shape, think twice. It's often better to leave those elements out and let the unique, borderless nature of transfer stickers shine.
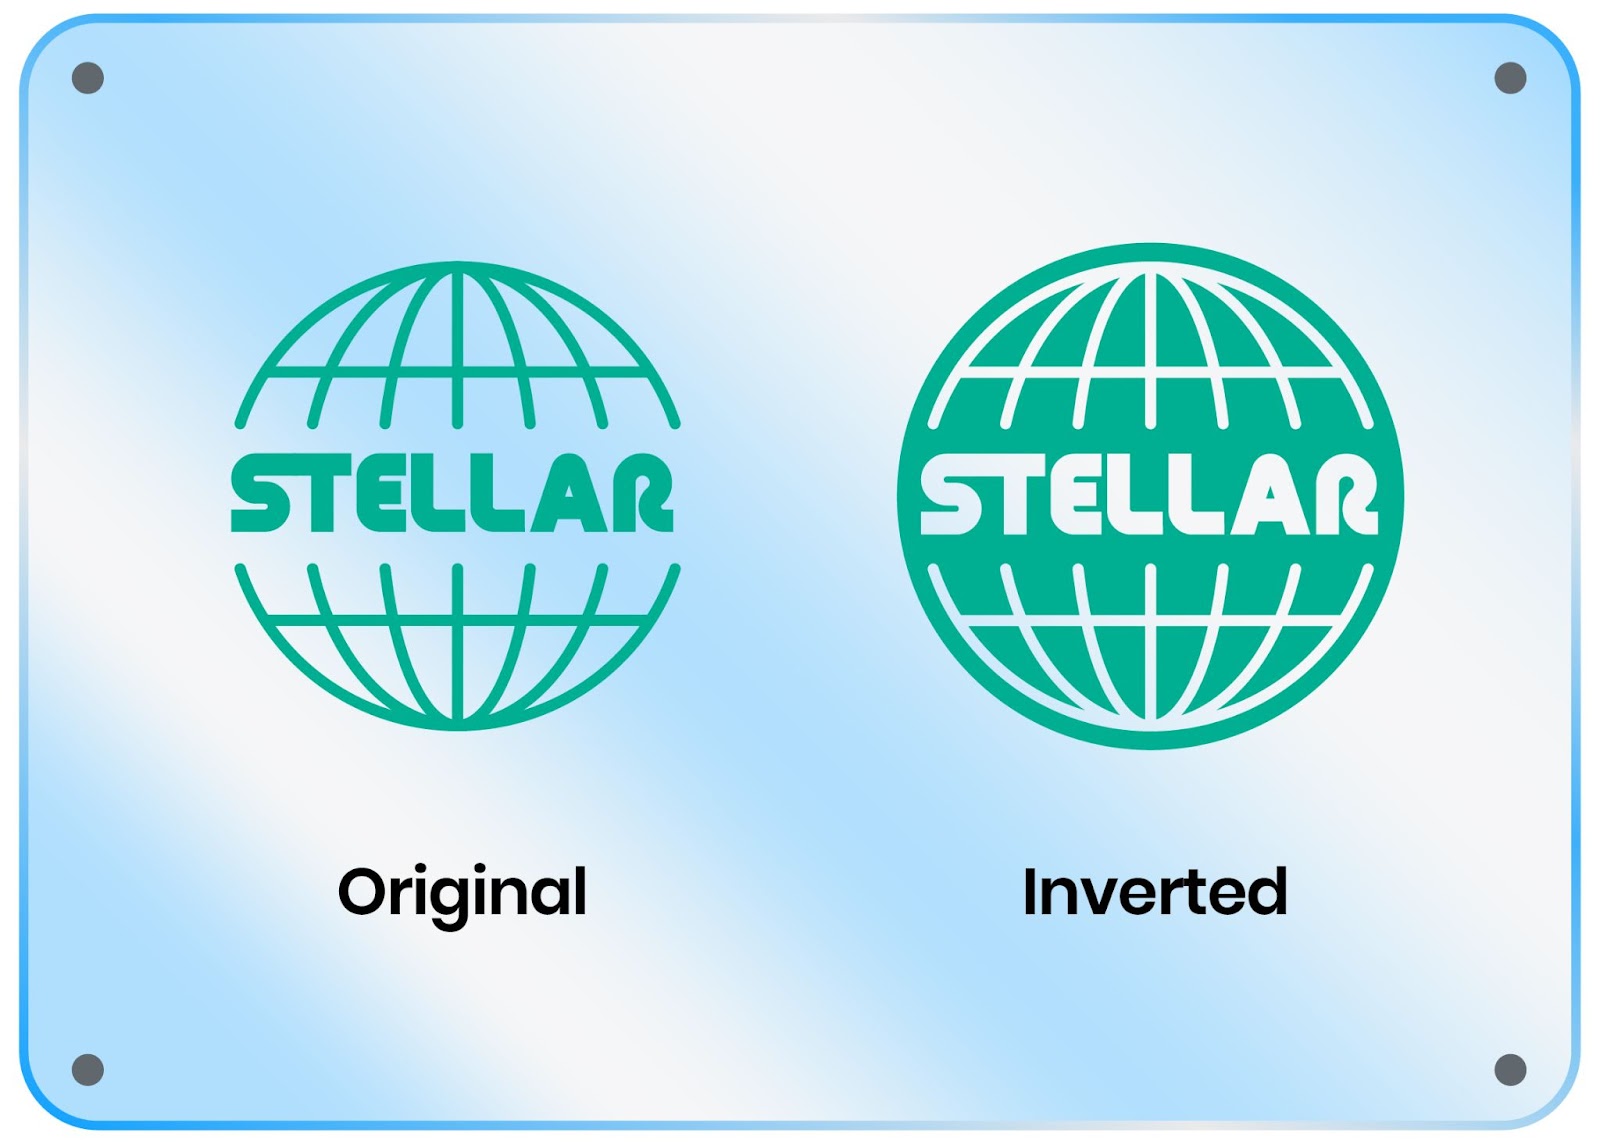
4. Original vs. inverted
Once your design is ready, consider flipping it and using an inverted version instead. In the example below, the solid parts create the visual, while in the inverted version, the removed parts define the design.
Keeping the surface in mind will help you make the best choice for your project, especially when selecting colors. For optimal contrast, choose a color that is significantly darker or lighter than the surface.
How to prepare your file
Before sending your design to us or any other transfer sticker printer, following these simple steps will help ensure a smooth production process.
Use vector artwork whenever possible
Vector formats like AI or EPS are scalable without losing quality, making them the preferred choice for printing. We’ve previously explained the difference between raster and vector images in another article. If you don’t have access to professional software like Adobe Illustrator, try our Redraw feature—we’ll happily create a vector graphic from your existing image.
Outline text
If your design includes text, be sure to convert it to outlines before exporting. Missing fonts can cause issues if adjustments are needed. Pro tip: Always keep an editable version of your file in case you need to make changes later.
Clean up anchor points
Minor imperfections or unnecessary details often appear during the design process. Before printing, take a close look and simplify where possible. This is especially important for transfer stickers since every bump or irregularity will be part of the cutting process.
Scale your design correctly
Before exporting, ensure your design is set to the exact size you want it printed. If the solid and removed parts meet the required margins but the overall document size is incorrect, those margins may become too small.
To avoid this, set the final print size in advance and check the margins afterward. If your design includes strokes or effects that should scale proportionally, go to Window > Properties and enable Scale Strokes & Effects in Adobe Illustrator.
Colors
While we proudly offer full-color transfer stickers, many printers still only produce single-color vinyl transfer stickers. If you're designing for single-color printing, it's best to use a solid color, like black or white, to ensure a clean result.
For those seeking full-color transfer stickers, we’ve got you covered. To achieve accurate color reproduction, set your design to CMYK mode. Since most digital sketches are created in RGB, converting to CMYK beforehand helps prevent unexpected color shifts. To do this in Adobe Illustrator, go to File > Document Color Mode > CMYK Color.
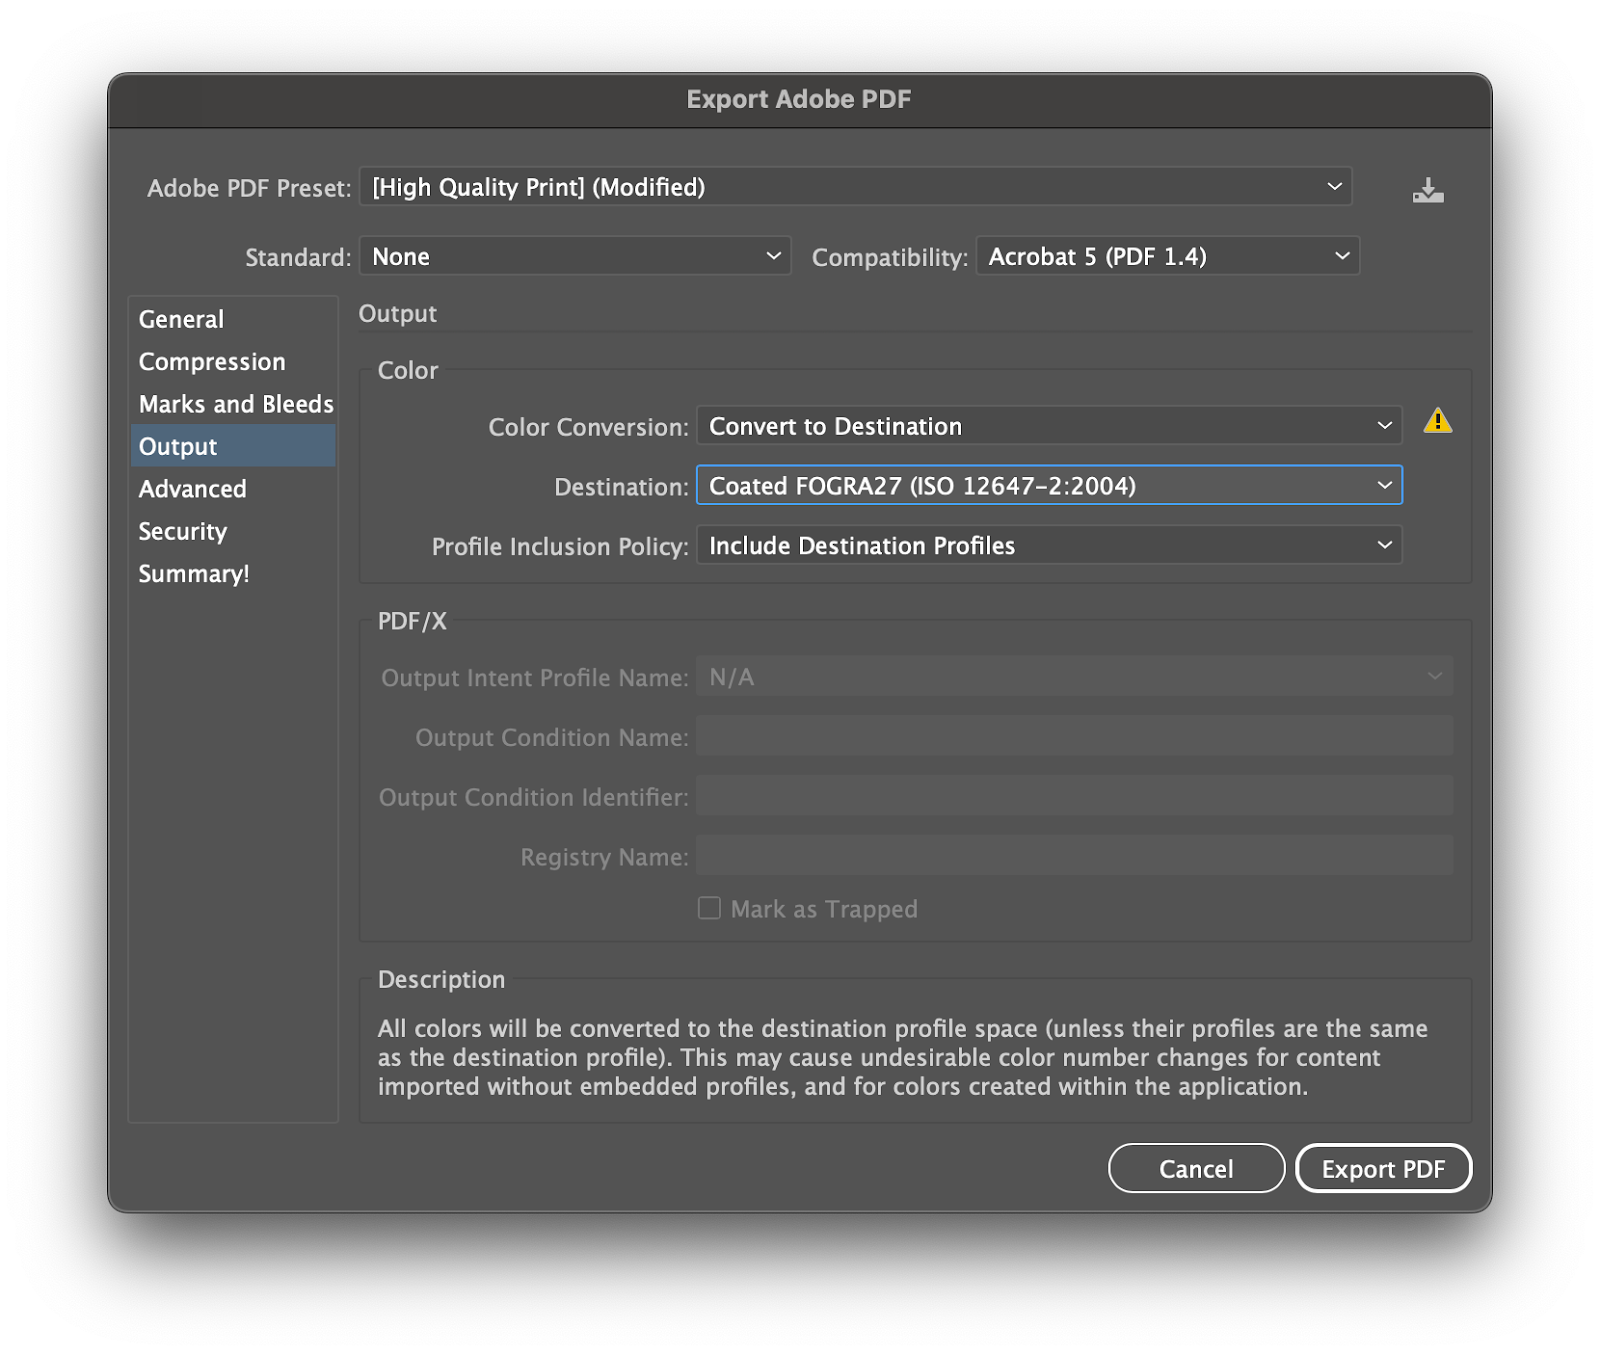
When exporting your file from Adobe Illustrator to a PDF, ensure that CMYK is selected. In the Output section, choose the Coated FOGRA27 color profile, a widely used standard for print.
The beauty of transfer stickers
Here’s why transfer stickers might be the perfect choice for your business or project:
Borderless Design – Transfer stickers have no background or borders, making your design stand out, especially on clear surfaces like glass, metal, or acrylic.
Durability – Made from premium vinyl, these stickers are built to last and are ideal for both indoor and outdoor use.
High Quality – Our unique process ensures the highest-quality printed transfer stickers. Each sticker comes pre-weeded on a protective transfer tape, safeguarding the design and allowing for easy application on any smooth surface.
If you’re looking for high-quality, full-color transfer stickers, you’re in the right place. With their seamless look and durability, transfer stickers make any design pop on surfaces like glass windows, vehicles, and more. And now, with full-color options available? That’s next-level.
Prefer a solid color instead? We also offer black and white vinyl transfer stickers.
Reacties